Multiport BliSwitch v1 (4-port)
BliSwitch v1 4-port KVM switch
"BliKVM-Switch-V1.0 uses and tests video, supporting BliKVM and PiKVM"
Introduction
BliKVM-Switch-V1.0 is a four channel HDMI+USB switch, which supports panel button, desktop controller and KVM remote to switch between computers. Maximum support of the switch itself 4K@60HZ Plug and play, driver free.
BliKVM-Switch-V1.0 uses the same hardware solution as XH-HK4401, AG7210 HDMI switching chip supports up to 4K@60Hz, CH444G USB switching chip supports USB2.0. The difference is that BliKVM-Switch-V1.0 is equipped with KVM USB cable, which can realize KVM port selection. BliSwitch v1 works on its own, but for KVM-Over-IP it needs BliKVM or other KVM. BliKVM-Switch-V1.0 is compatible with BliKVM and PiKVM.
"points for attention"
- The switch can be powered directly from the USB input to the computer, that is, the switch can work normally without power supply.
- If the USB power supply of the controlled computer cannot make the switch work, the switch can be powered independently.
- The switch package only provides a USB power cable, but does not provide a power adapter. The customer needs to configure a power adapter (5V).
- Desktop controller can control HDMI switch with USB cable. For customers who do not use KVM, this is another way of switching for easy cable management.
- HDMI input support up to 4096x2160/60Hz resolution
- 4K 60Hz input, the power is about 200 mW.
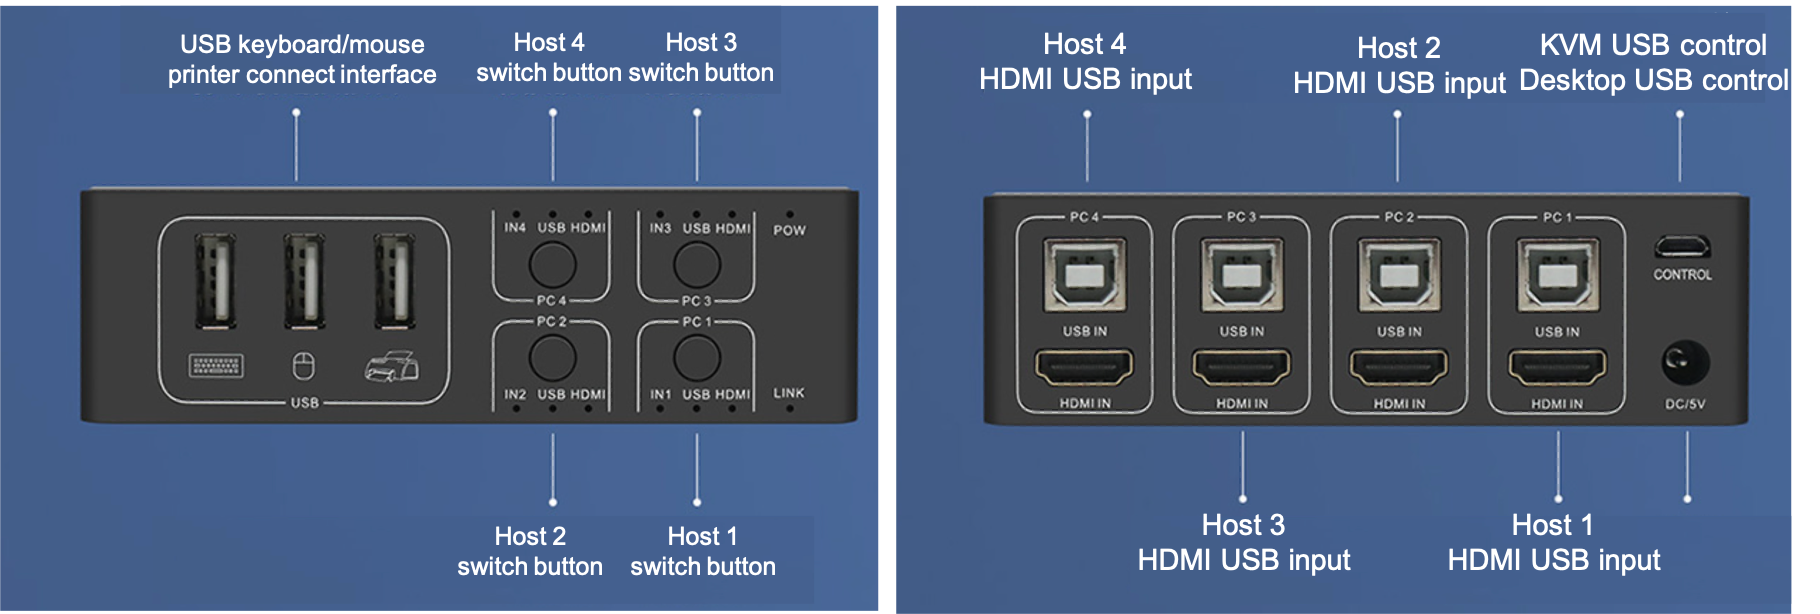
Interface Diagram
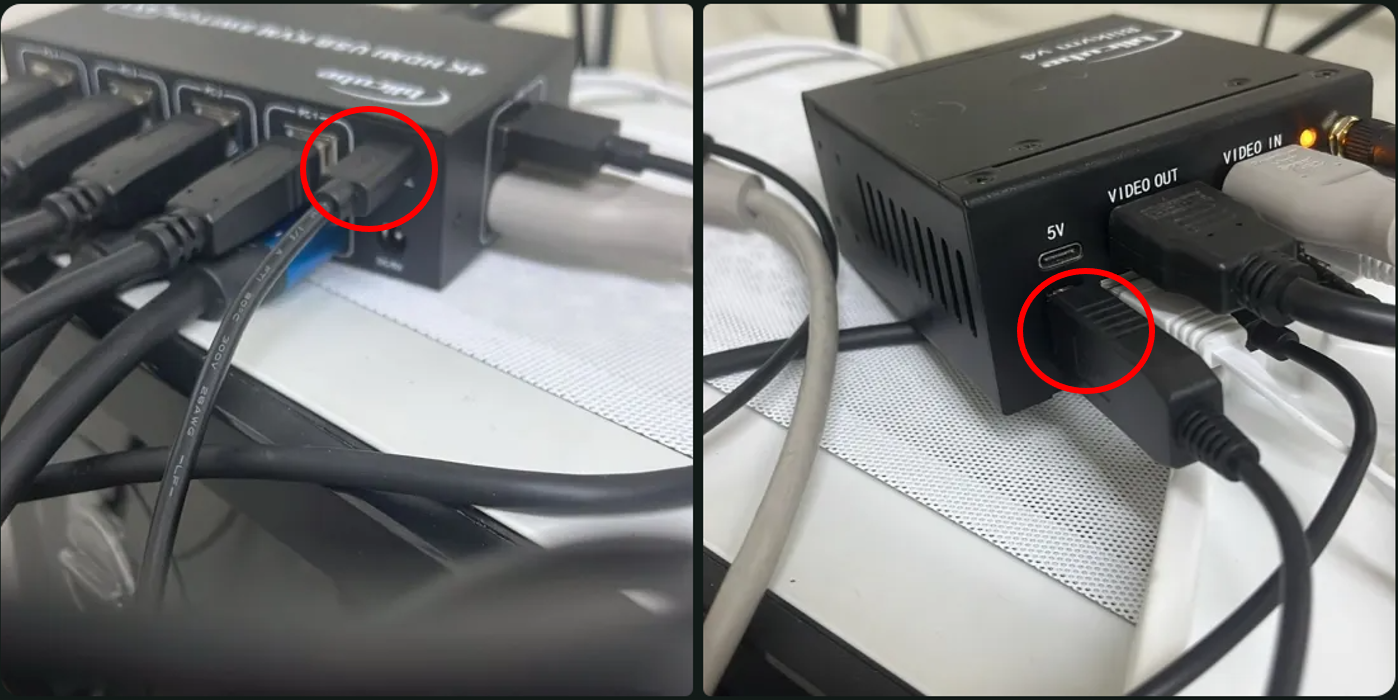
"There must be 2 USB cables from KVM to BliKVM, one for controller, and second from USB on KVM to USB-PC on BliKVM."
"Front and back interface diagram, the control interface in the right figure is the remote control interface.A cable with one end being USB-A and the other end being micro USB, labeled with the word "KVM," serves as the control cable. The micro USB end is connected to the control interface of the switch, while the USB-A end is connected to the USB port of the KVM."
 BliKVM v4 connect to the switch example:
"Schematic Diagram of Side Interface."

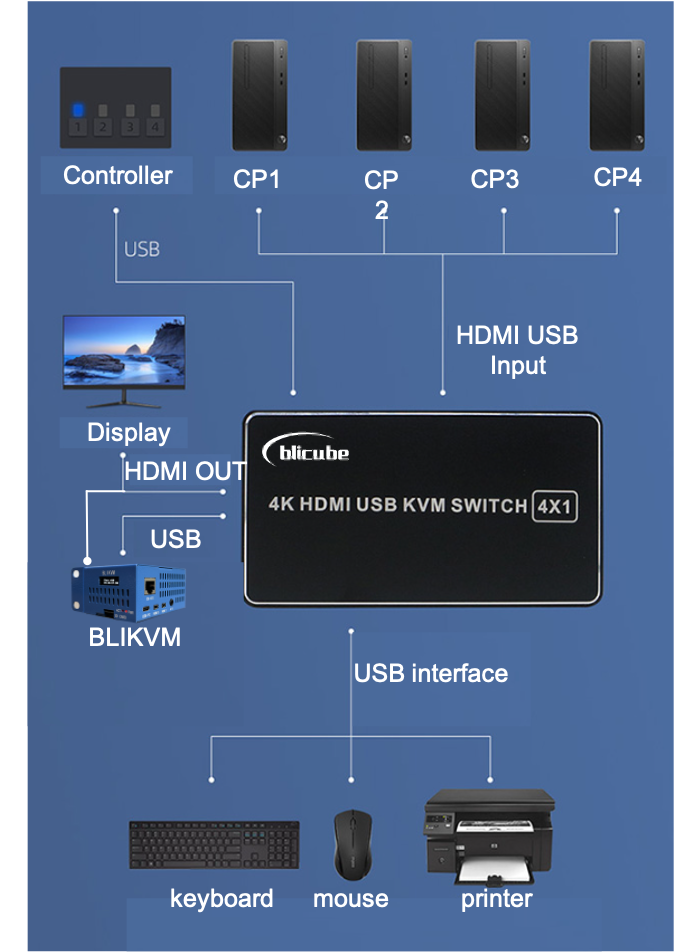
"Equipment connection diagram."
Software Configuration
"If you are using BliKVM software, from version 1.5.3 onwards, power on the switch and connect the cables before starting BliKVM, then enable and configure it through the web interface."
- If multiple USB devices are connected, use the command
ls /dev/ttyUSB*to identify the switch's device name, then configure it through the web interface.
"If you use PiKVM software, please configure it according to the following instructions."
- Log in to PiKVM through SSH. The user name and password are root;
- Uses the
rwcommand on the terminal to change the system to a read-write system; - Edit
/etc/kvmd/override.yaml. After the original content, add:kvmd:
gpio:
drivers:
hk:
type: xh_hk4401
device: /dev/ttyUSB0
scheme:
ch0_led:
driver: hk
pin: 0
mode: input
ch1_led:
driver: hk
pin: 1
mode: input
ch2_led:
driver: hk
pin: 2
mode: input
ch3_led:
driver: hk
pin: 3
mode: input
ch0_button:
driver: hk
pin: 0
mode: output
switch: false
ch1_button:
driver: hk
pin: 1
mode: output
switch: false
ch2_button:
driver: hk
pin: 2
mode: output
switch: false
ch3_button:
driver: hk
pin: 3
mode: output
switch: false
view:
table:
- ["#Input 1", ch0_led, ch0_button]
- ["#Input 2", ch1_led, ch1_button]
- ["#Input 3", ch2_led, ch2_button]
- ["#Input 4", ch3_led, ch3_button] - Use the
rocommand on the terminal to reset the system to a read-only system; - Use
systemctl restart kvmdon the terminal to restart the service; - Enter the PiKVM web interface and click the "GPIO" menu. You should see 4 inputs, one of which has a green circle to indicate that it is currently selected. Click a different input to change the selected host.

" The above configuration is based on the 2022 PiKVM image. If you are using the latest PiKVM image or latest software version, edit
/etc/kvmd/override.yaml and add the line: protocol: 2. Example:"kvmd:
gpio:
drivers:
hk:
type: xh_hk4401
protocol: 2
device: /dev/ttyUSB0
scheme:
ch0_led:
driver: hk
...
Control Protocol
"If you want to use the blicube switch on other platforms, please refer to the following protocol"
- The communication baud rate is 19200
- The message to switch to channel 1 isSW1\r\nG01gA
- The message to switch to channel 2 isSW2\r\nG02gA
- The message to switch to channel 3 isSW3\r\nG03gA
- The message to switch to channel 4 isSW4\r\nG04gA
- The message returned by the switch for the current channel is:G01gA,G02gA,G03gA,G04gA
Packing List
| product | quantity | note |
|---|---|---|
| HDMI KVM Switch(4-channel) | 1 | 110mm * 60mm * 33mm |
| Desktop controller | 1 | |
| USB cable of Desktop controller | 4 | length: 1.2m |
| HDMI(Standard) cable | 5 | length: 1.5m |
| USB power cable | 1 | length: 0.8m |
| USB cable of KVM | 1 | length: 1.5m |
| USB cable of Desktop controller | 1 | length: 1m |